
Introduction
Heart-shaped breadsticks are a delightful and charming addition to any meal, perfect for special occasions or simply to bring a smile to loved ones’ faces. These whimsical treats not only add a touch of romance to dinner tables but also come with a delightful crunch and a soft, airy interior that is sure to impress. Imagine serving these warm, golden-brown breadsticks at a candlelit dinner or as part of a festive family gathering. This recipe is designed to guide you through the process of making these delicious breadsticks from scratch, detailing each step and providing insights into the ingredients and techniques involved. Whether you’re a novice baker or an experienced cook, you’ll find everything you need to create these adorable and tasty treats.
The Appeal of Heart-Shaped Breadsticks
The magic of heart-shaped breadsticks lies in their versatility and the joy they bring to various occasions. For romantic dinners, they serve as a perfect accompaniment to pasta or salad, elevating the dining experience with their charming shape. Imagine sharing a plate of these heart-shaped delights with your significant other, dipping them in a rich marinara sauce or olive oil infused with herbs.
These breadsticks also shine at family gatherings and festive celebrations. Their playful shape is sure to be a hit with children and adults alike, making them a fun addition to birthday parties, anniversaries, or holiday feasts. They can be served alongside soups, stews, or served as a snack on their own, bringing warmth and cheer to the table.
Additionally, heart-shaped breadsticks can be customized to suit various tastes. Experimenting with flavors like garlic, rosemary, or even cheese can make them a personalized treat that reflects your culinary style. Ultimately, heart-shaped breadsticks are not just food; they are a heartfelt gesture that conveys love and warmth.
Understanding the Ingredients
To create these delightful heart-shaped breadsticks, it’s essential to understand the role of each ingredient. This knowledge will not only help you appreciate the baking process but also allow for modifications and creativity as you make the recipe your own.
– Active Dry Yeast: The backbone of any bread recipe, active dry yeast is a leavening agent that ferments the dough, creating carbon dioxide bubbles that cause the breadsticks to rise. The result is a light and airy texture that is a hallmark of freshly baked bread.
– Warm Water: This ingredient is crucial for activating the yeast. The ideal temperature is around 110°F (43°C) – warm enough to awaken the yeast without killing it. Too hot, and you risk deactivating the yeast; too cold, and it won’t activate properly.
– Sugar: A small amount of sugar not only adds a hint of sweetness but also feeds the yeast, promoting its growth during the fermentation process. This results in a better rise and a slight sweetness that balances the savory elements of the breadsticks.
– Olive Oil: This ingredient enhances the flavor of the breadsticks while adding moisture. It contributes to a tender crumb and a lovely golden color during baking. Olive oil is also a healthier fat option compared to butter.
– Salt: Essential for flavor, salt also strengthens gluten, which helps to create the structure of the breadsticks. It plays a critical role in balancing the overall taste and ensuring the breadsticks are not bland.
– All-Purpose Flour: The foundation of the breadsticks, all-purpose flour provides the necessary gluten structure for the dough. Its protein content allows the dough to rise while maintaining a chewy texture.
– Optional Ingredients: For those who want to elevate the flavor profile, consider adding garlic powder for a hint of savory aroma or dried Italian herbs like oregano or basil for a touch of Mediterranean flair. These optional ingredients can transform your heart-shaped breadsticks into a flavor-packed delight.
Step-by-Step Instructions to Make Heart-Shaped Breadsticks
Now that you have a deeper understanding of the ingredients, let’s dive into the step-by-step process of making heart-shaped breadsticks. Each step is crucial for achieving the perfect texture and flavor.
Activating the Yeast
The first step in your breadstick-making journey is activating the yeast. Begin by measuring out the warm water in a bowl and adding the sugar. Stir gently to dissolve the sugar completely. Next, sprinkle the active dry yeast over the surface of the water. Allow it to sit for about 5 to 10 minutes until it becomes foamy. This foaming action indicates that the yeast is active and ready to work its magic in the dough.
Making the Dough
Once the yeast is activated, it’s time to bring together the other ingredients to form the dough. In a large mixing bowl, combine the all-purpose flour and salt. Make a well in the center of the flour mixture and pour in the foamy yeast mixture along with the olive oil. Using a wooden spoon or spatula, mix the ingredients until they come together to form a shaggy dough.
At this stage, the dough may appear a bit sticky and uneven, but that’s perfectly normal. The goal is to ensure that all the flour is incorporated into the wet ingredients.
Kneading the Dough
Kneading is a vital step in bread-making that develops the gluten in the dough, giving the breadsticks their structure and chewiness. Transfer the shaggy dough to a lightly floured surface. With clean hands, begin to knead the dough by folding it over itself and pressing down with the palms of your hands. Rotate the dough a quarter turn and repeat the process.
Knead the dough for about 8-10 minutes, or until it becomes smooth and elastic. You should be able to stretch the dough without it tearing, which indicates that the gluten has developed properly. If the dough is too sticky, sprinkle a little extra flour as needed, but be cautious not to add too much, as it can make the breadsticks dense.
Letting it Rise
After kneading, the next step is to let the dough rise. This process is crucial for developing flavor and texture. Shape the kneaded dough into a ball and place it in a lightly greased bowl, turning it to coat all sides with oil. Cover the bowl with a clean kitchen towel or plastic wrap and place it in a warm, draft-free area.
Allow the dough to rise for about 1 to 1.5 hours, or until it has doubled in size. The science behind this process lies in yeast fermentation – as the yeast consumes the sugar, it produces carbon dioxide, which causes the dough to expand. To check if the dough has risen sufficiently, gently press two fingers into the dough; if the indentation remains, it’s ready for the next step.
With the dough now risen and ready, you will be well on your way to shaping your heart-shaped breadsticks. Stay tuned for the next steps that will guide you through this delightful baking adventure.
Shaping the Breadsticks
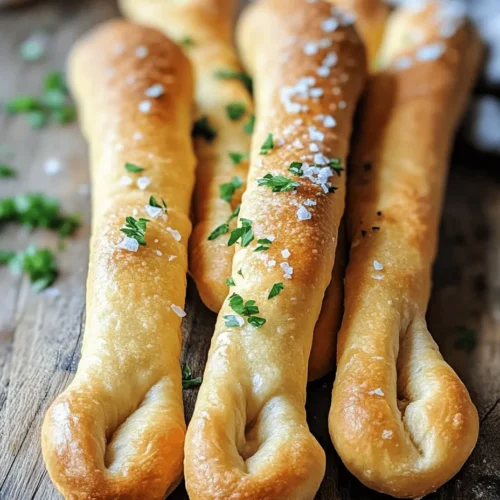
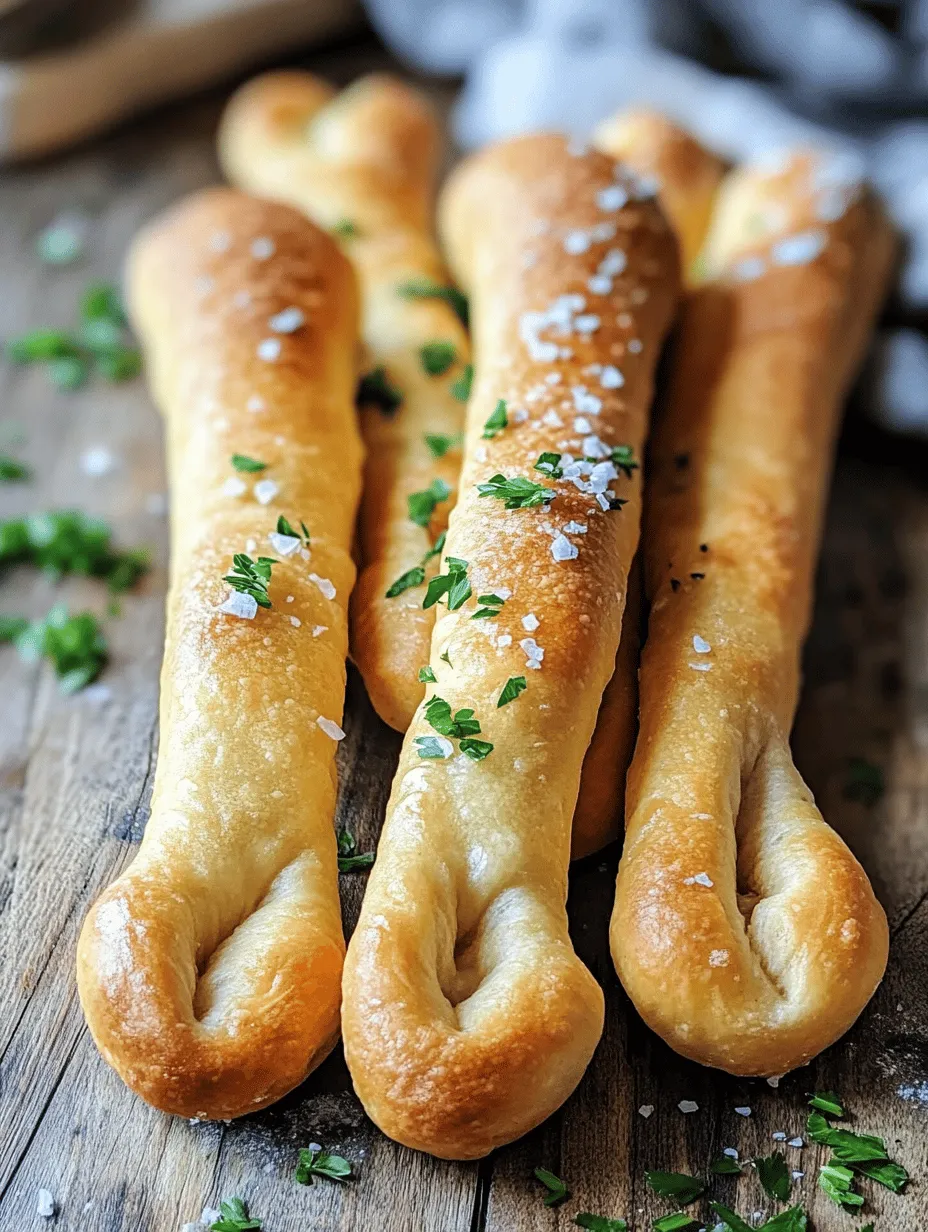
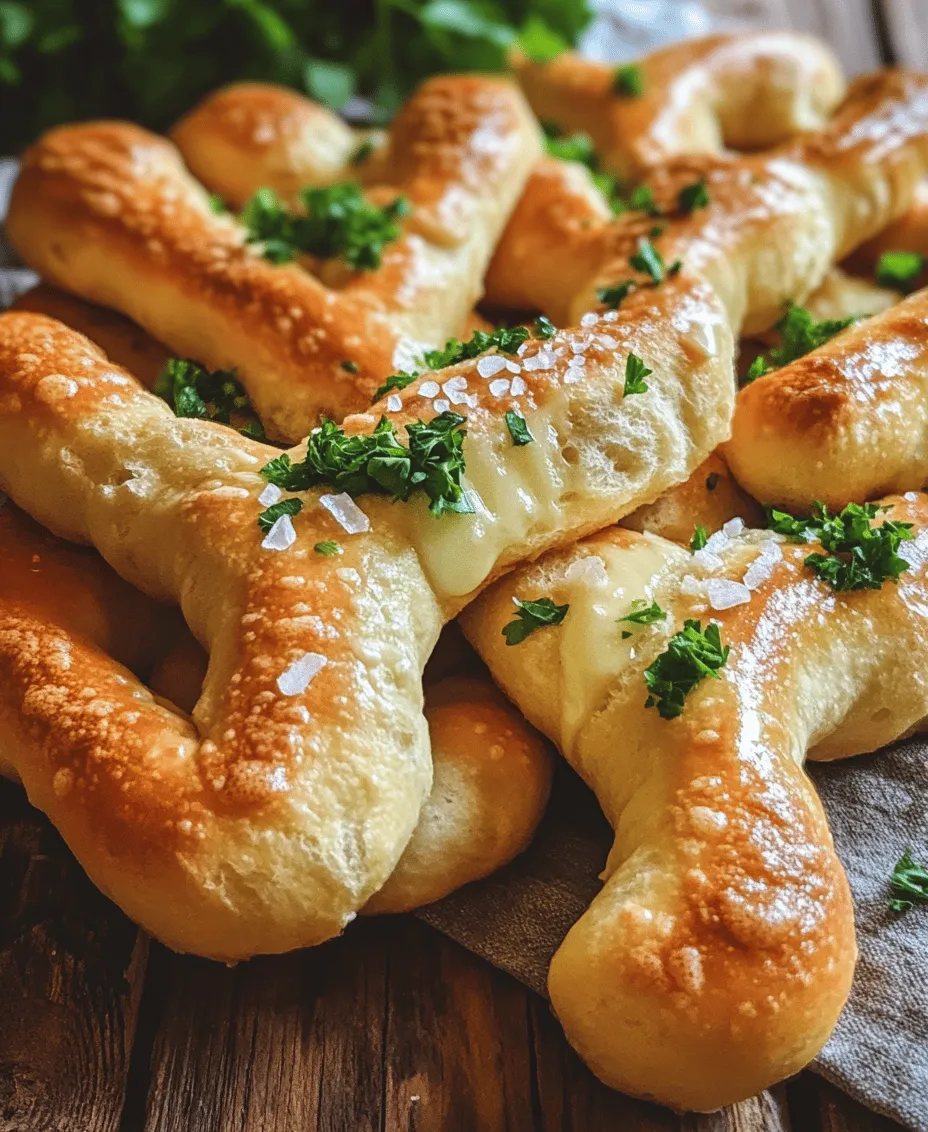
Shaping your breadsticks into charming heart shapes is one of the most delightful aspects of this recipe. This step not only adds a beautiful aesthetic but also makes your breadsticks perfect for romantic dinners, celebrations, or simply to add a touch of love to your meals.
To create the heart shape, start by dividing your dough into equal portions, about the size of a golf ball. Roll each piece into a long rope, approximately 10-12 inches in length. Once you have your ropes, form a heart by taking the two ends and curving them towards the center while pinching the bottom of the rope together to create a point. This technique gives you a lovely heart shape that is both appealing and easy to handle.
For a more intricate design, you can twist the dough ropes together before shaping them into hearts, adding a unique texture to each stick. Alternatively, for a rustic look, you can gently flatten the dough ropes with your fingers, giving them a broader shape while still maintaining the heart outline. The key is to ensure that the dough is not too thick, as this can affect the baking time and texture.
Second Rise
After shaping your heart-shaped breadsticks, the second rise is a crucial step that enhances their texture and flavor. This rise allows the gluten structure to develop further, resulting in a lighter, airier breadstick. Place your shaped breadsticks on a parchment-lined baking sheet, ensuring they have enough space to expand without touching. Cover them lightly with a clean kitchen towel or plastic wrap to prevent them from drying out.
Let the breadsticks rise for an additional 30 minutes to 1 hour, or until they have noticeably puffed up. The ideal environment for rising is a warm, draft-free area. If your kitchen is cool, you can preheat your oven to a low temperature (around 100°F), then turn it off and place the breadsticks inside to rise. This method creates a cozy atmosphere that promotes yeast activity, resulting in a delightful texture.
Preheating the Oven
Preheating your oven is an essential step that should not be overlooked. The right baking conditions are vital for achieving perfectly cooked breadsticks. Set your oven to 375°F (190°C) and allow it to preheat thoroughly for at least 15-20 minutes. This ensures that the breadsticks start baking immediately upon entering the oven, which helps them rise properly and develop a beautiful crust.
To ensure even baking, consider using a pizza stone or a baking steel if you have one. Place it in the oven while it preheats. This method retains heat better and can give your breadsticks a crispier bottom. If you do not have a pizza stone, a regular baking sheet will work just fine; just make sure it is properly preheated.
Brushing and Baking
Before placing your breadsticks in the oven, it’s time to add the final touches. Brush each heart-shaped breadstick lightly with melted butter or olive oil to enhance their flavor and create a golden, glossy finish. You can also sprinkle them with coarse sea salt, garlic powder, or dried herbs like oregano or rosemary for an extra layer of flavor.
Once your oven has reached the desired temperature, carefully place the baking sheet in the oven. Bake the breadsticks for about 12-15 minutes, or until they are golden brown and sound hollow when tapped on the bottom. Keep an eye on them during the last few minutes of baking to prevent over-browning. If you notice they are browning too quickly, you can tent them lightly with aluminum foil.
Serving Suggestions
Once your heart-shaped breadsticks are out of the oven, it’s time to present them beautifully. Serve them warm, straight from the oven, for the best flavor and texture. Consider placing them in a small basket lined with a cloth napkin for a rustic presentation.
These breadsticks pair wonderfully with various dips and spreads. Marinara sauce is a classic choice, perfect for those who enjoy a tangy flavor. Garlic butter adds a rich taste that complements the breadsticks beautifully. For a Mediterranean twist, serve them with a side of olive oil mixed with balsamic vinegar or herbs for dipping.
Additionally, heart-shaped breadsticks can be served alongside salads, soups, or as a side to your favorite main dishes. Their charming shape and delicious flavor make them versatile enough to accompany any meal.
Tips for Perfect Breadsticks
Achieving the perfect heart-shaped breadsticks may come with a few challenges, but with the right insights, you can easily overcome them.
Achieving the Right Dough Consistency
When kneading your dough, you want a smooth, elastic consistency that doesn’t stick excessively to your hands or the work surface. The dough should feel slightly tacky but not overly wet. If it’s too sticky, incorporate a small amount of flour, a tablespoon at a time, until you reach the desired texture. Conversely, if your dough appears dry and crumbly, add a little water, a teaspoon at a time, ensuring it becomes pliable.
Perfecting the Heart Shape
Visual cues are essential for shaping your breadsticks. The dough should be soft and pliable, allowing you to create the desired heart shape without tearing. If the dough resists shaping, let it rest for a few minutes to relax the gluten, making it easier to mold.
Monitoring Baking Time
Baking breadsticks is all about timing. Check them a couple of minutes before the recommended baking time to ensure they don’t overbake. The ideal breadstick should be golden brown on the outside, with a firm yet tender texture. If you aren’t sure, you can always use a toothpick to test for doneness; it should come out clean when inserted into the breadstick.
The Versatility of Heart-Shaped Breadsticks
Heart-shaped breadsticks are not only a delightful treat but also remarkably versatile. You can customize the flavors and ingredients to cater to different tastes and dietary needs.
Flavor Variations
Consider incorporating different flavors into your breadsticks. Adding shredded cheese, such as mozzarella or Parmesan, to the dough can create a cheesy delight. Alternatively, mix in fresh herbs like basil or thyme for an aromatic experience. For a spicy kick, try adding red pepper flakes or garlic powder, giving your breadsticks an extra layer of flavor that pairs beautifully with various dishes.
Dietary Adaptations
For those with dietary restrictions, heart-shaped breadsticks can easily be modified. To create gluten-free breadsticks, substitute traditional flour with a high-quality gluten-free all-purpose blend. Ensure that the blend includes xanthan gum, which helps mimic the texture of gluten in baked goods.
If you’re looking for vegan options, replace the butter with plant-based margarine and use non-dairy milk for the dough. These substitutions will maintain the breadsticks’ delightful texture while accommodating varying dietary preferences.
Pairing Suggestions
To elevate your dining experience, consider complementing your heart-shaped breadsticks with suitable dishes and beverages.
Ideal Dips
Dips are a fantastic way to enhance the flavor of your breadsticks. Marinara sauce pairs perfectly, adding a tangy contrast to the warm bread. For a richer option, garlic butter made with melted butter and minced garlic is a delicious choice. You can also serve a simple olive oil dip seasoned with herbs for a Mediterranean flair.
Meal Pairings
Heart-shaped breadsticks make an excellent accompaniment to a variety of meals. They work well with salads, providing a crunchy texture that balances fresh greens. Additionally, serving them with soups like tomato basil or minestrone provides a comforting experience. For heartier meals, pair them with pasta dishes or roasted vegetables, creating a harmonious combination that is sure to impress.
Conclusion
Heart-shaped breadsticks are not only visually appealing but also offer a delicious homemade touch to any meal. By following this comprehensive guide, you can create these delightful breadsticks to share with friends and family, enhancing your dining experience with a bit of love and creativity. The process of baking these breadsticks is rewarding, and the joy of sharing your heart-shaped creations will surely make any occasion even more special. Enjoy the art of baking and the taste of your heart-filled creations!